
After a pumping session, the parts often end up spread across the counter while the next session gets closer. A valve may still hold water, or a small connector may disappear under a flange. A drying rack cannot solve every cleaning problem, but a consistent layout makes those details easier to see.
That matters most when sessions are close together, or the breast pump has to be packed for work. The time spent checking, drying, and finding small parts is easy to underestimate when the routine happens several times a day.
A few changes to the way the rack is arranged can make the next check less uncertain. The sections below separate flanges, small parts, and tubing so each piece has room to drain and can be inspected before it is stored. Follow the cleaning and drying instructions for your specific breast pump model.
Why Good Airflow Is the Secret to Faster Drying
After a morning session, a duckbill valve can still be damp by the time the next session is due, even when the larger pieces look dry. Its folds and narrow edges hold water longer than a flat flange.
Here’s what’s happening: when breast pump parts lie flat on a surface or lean against each other, water has nowhere to go. It pools in crevices, it clings to silicone, and air can’t circulate to carry it away. A flange resting on a wet towel is basically sitting in its own puddle – no wonder it takes forever to dry.
Good airflow fixes this. It means water evaporates faster, fewer water spots form on plastic parts, and that faint “damp silicone” smell that builds up over time doesn’t stand a chance. HealthyChildren recommends air-drying pump parts and cleaning tools after washing. Your arrangement directly affects how fast and how evenly they dry.
This isn’t about buying a fancy new rack. It’s about using what you already have – just more strategically.
How to Arrange a Breast Pump Parts Drying Rack
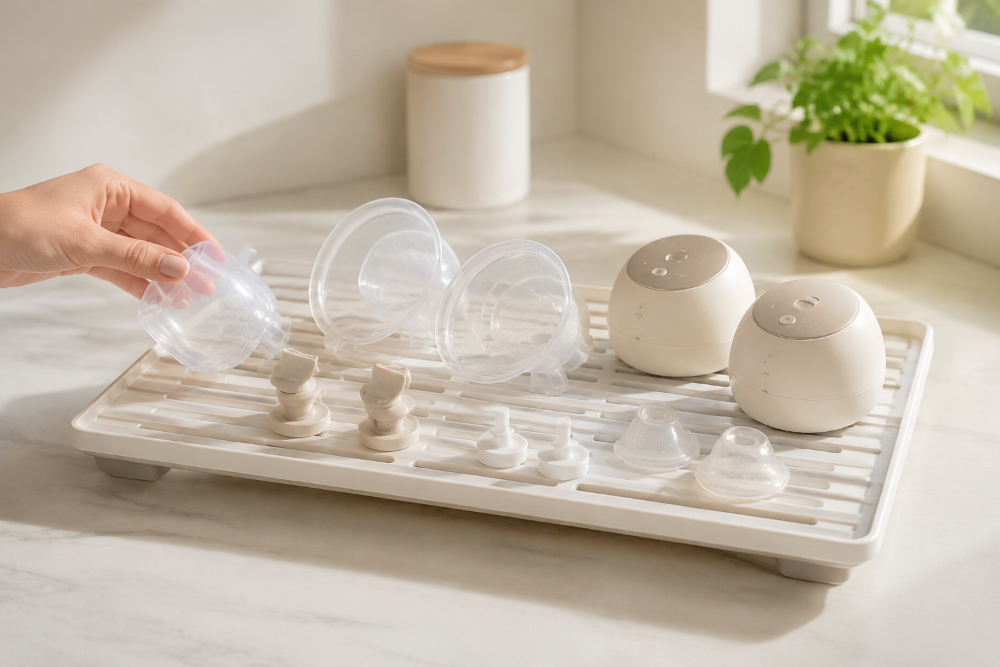
After a few pumping sessions, your counter can look like a tiny parts department: flanges spread out like bowls, silicone pieces hiding in the corners, and tubing looping around anything that will hold it. Then the next session arrives, and you are left playing “Which piece is still wet?” Give each type of part a familiar home on the rack, and the whole setup becomes easier to read – what is drying, what is ready to store, and where the next washed piece should go.
Finding the Right Spot for Your Drying Rack
The rack’s location affects how much clean air reaches the parts and how much splash reaches them from the sink.
Choose a counter area away from direct sink splash and leave space around the rack. A spot behind a toaster or coffee maker can restrict airflow, while a crowded corner makes it harder to notice water under a part.
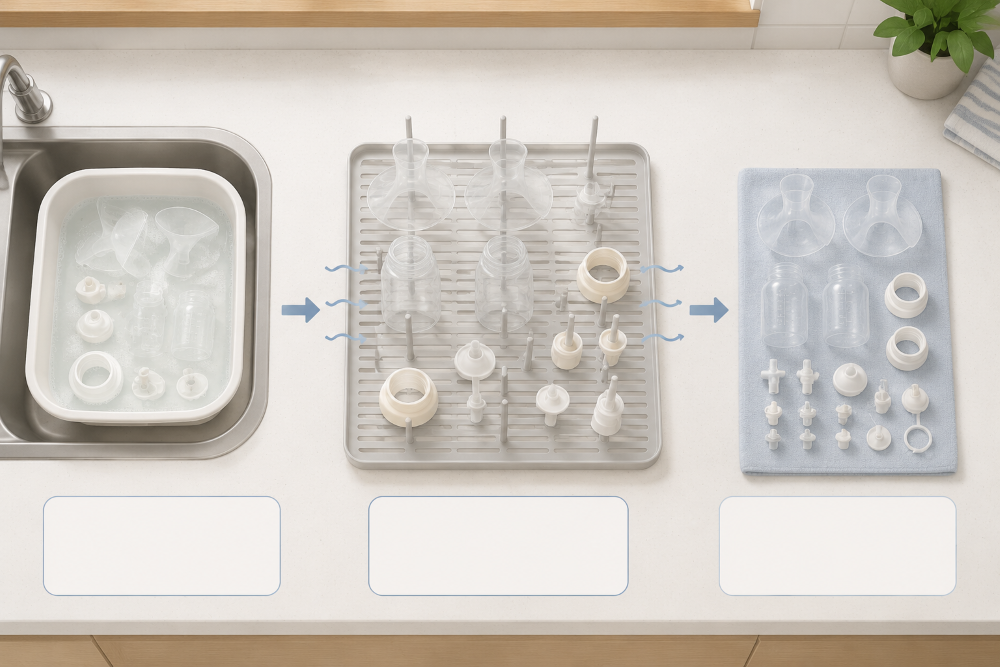
Once you have found the spot, set up a simple left-to-right flow so the rack stays readable when sessions stack up. Place washed, clean parts on one side, let them dry in the open middle, and move fully dry pieces to the opposite side for storage. No labels are needed. Use the same path every time, whether you are packing for work, cleaning up between calls, or finishing before the baby wakes.
When the rack is already full, and the next session is less than an hour away, put the newly washed flanges and collection bottles on the wash side instead of covering parts still drying in the middle. Keep valves and connectors in the open center, where you can see whether they are holding water. As soon as a part is fully dry, move it to the storage side. That keeps the rack from turning into one crowded pile, and you can grab what you need without shifting damp pieces around.
Give Flanges Some Space
Flanges are weird little things. You want them upright or tilted, whatever your rack can handle. Just don’t lay them flat. If water’s hiding along an edge, you want to see it without having to flip every single piece over like you’re inspecting evidence.
Small parts need their own system too. Group them together, sure, but for heaven’s sake don’t pile them up. Spread them out so you can actually see each one; check the folds, the gaps, the spots where water thinks it’s clever. A shallow open basket works great for lightweight stuff, as long as air can move through. Skip the deep cup or closed bin. That’s where silicone pieces get cozy with each other and stay wet for hours.
Bonus: when everything’s out in the open, you’ll notice right away if something’s missing. That little valve or connector not in its usual place? You’ll catch it before the next wash, not when you’re mid-assembly and cursing under your breath.
Give Tubing and Wet Spots Their Own Attention
Tubing needs a little extra thought. It holds moisture differently than a flat piece, and water likes to hide inside. Follow whatever drying position your pump’s manual suggests, whether that means hanging it or keeping it open to airflow. Either way, give it its own spot. Don’t coil it under other parts, and don’t throw it in the washer unless the instructions clearly say it’s safe.
Also take a look at the rack tray itself. If water’s pooling under a part, move it or empty the tray per your rack’s care instructions. A drying rack only works when water can actually move away from what’s on it.
Before you reassemble, check openings, seams, and any tubing your model asks you to handle. Look for visible moisture or condensation, and hold pieces up to the light if that helps you see trapped water. Still damp? Leave the piece out and follow the manufacturer’s guidance. CDC notes that tubing that does not touch milk usually does not need routine washing when the breast pump is used as directed, so treat tubing by your model’s instructions rather than assuming every tube needs the same wash-and-dry steps.
What to Do If Breast Pump Parts Are Still Wet
If you spot a droplet just as you are getting ready to pump or leave the house, set that piece aside. Turn the wet opening or seam toward open air and keep it away from the dry set. A duckbill valve, a narrow connector, or a flange left flat on a damp surface may need more time because water can remain in folds and channels. Do not wipe or pat the breast pump parts dry with a dish towel, which can transfer germs. Place them on a clean, unused towel or paper towel and let them air-dry fully before you store or pack them
The travel bag comes after the drying step. Keep damp tubing or another enclosed part on the rack and check the breast pump manual for model-specific instructions. Moisture may remain inside the tube even when the outside feels dry. If time is short and a completely dry spare set is available, use it for the next session and leave the damp pieces separate. Before closing the bag, inspect the edges and openings where a small drop can hide.
Part count can shape the drying routine, especially when sessions are close together or you need to pack for work. When comparing breast pumps, fewer washable components can mean fewer pieces to inspect, dry, and repack. For example, the eufy Wearable Breast Pump S2 Pro has five washable parts to clean, which can leave fewer seams and openings to check before packing. Each piece still needs to be cleaned and fully dry.
Conclusion
A drying rack works best when it becomes part of the pumping routine, not another item competing for counter space. Keep the rack in a low-splash spot, leave room around the parts, and give flanges, small pieces, and tubing their own visible positions. That makes water spots easier to catch, helps prevent damp parts from being packed away, and saves you from searching for a missing valve when the next session is already due.
The goal is a drying routine that fits your counter and your schedule, so the next session starts with a ready set instead of another round of searching. If you are still comparing options, eufy breast pumps are one place to browse alongside the setup you already have.